Want to avoid a multi‑thousand dollar battery replacement? Knowing how to clean the hybrid battery cooling fan keeps your system breathing easy. It also helps prevent the overheat warnings that leave drivers stranded and stressed. I’ve done this a few times on my own cars and on friends’ Priuses. A little care goes a long way.
A clogged cooling fan can make the hybrid battery overheat. That can mean dropped performance, fault codes, and costly repairs. I’ll walk you through simple, effective steps to clean the hybrid battery cooling fan yourself. You’ll learn what tools to use, what to avoid, and when to call a pro. By the end, you’ll know how to protect your battery and keep your car running cooler.
Ready to learn how? Let’s dive in!
Tools And Materials Needed
Cleaning the hybrid battery cooling fan is easier when you have the right gear. Below I list the tools I use most often. I keep them in a small kit in my garage so I can do quick checks every few months.
Protective Gear
Wear nitrile or insulated gloves to protect your hands. Use safety glasses to keep dust and small debris out of your eyes. A simple dust mask helps if the fan area is very dirty. These items reduce risk and make the job cleaner and faster.
Cleaning Tools
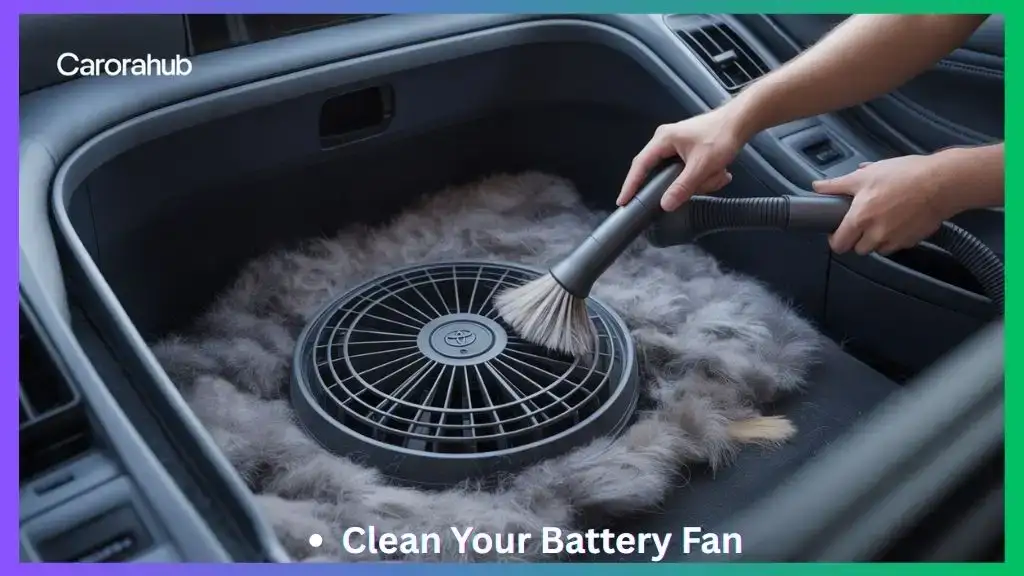
A soft-bristled brush (like a paintbrush) works well to loosen dust. A handheld vacuum with a narrow nozzle cleans up loosened debris. A can of compressed air helps reach tight spots—use short bursts and keep the can upright to avoid liquid propellant.
Basic Hand Tools
Have a small screwdriver set (Phillips and flat). A 10 mm wrench or socket is handy for bolts. Keep a magnetic tray or small container to hold screws so nothing gets lost.
Cleaning Cloths And Solutions
Use microfiber cloths for a final wipe. For grime on plastic parts, a mild automotive cleaner or isopropyl alcohol (electronics-safe) works. Avoid soaking anything; moisture near electrical parts is risky.
Work Area Setup
Work in a well-lit, ventilated area. Clear a flat surface for parts and tools. Lay a towel to hold the removed cover and fasteners. Good lighting and organization cut mistakes and speed up reassembly.
Optional tools and replacement parts
If you want to go further, keep a small replacement fan motor and a new fan cover gasket on hand for older cars. A handheld inspection camera (endoscope) can help see into tight ducts. These are not required, but they save time if you find damage.
Read More: Best Replacement Hybrid Batteries For Toyota Prius
Safety Precautions
Because the cooling fan sits close to high-voltage parts and the battery pack, safety matters. I always follow a checklist before I touch anything. Take these steps to protect yourself and the car.
Disconnect The Hybrid Battery
Always disconnect the hybrid system first. Locate the service disconnect, main fuse, or isolation switch and follow your owner’s manual. Cutting power reduces the risk of shock and prevents accidental faults. If you’re unsure, have a pro do this step.
Wear Protective Gear
Gloves and safety glasses are non-negotiable. Insulated gloves add protection when you’re near electrical connectors. I also recommend a dust mask if the fan has heavy buildup. These simple items keep the job safe and comfortable.
Work In A Well-ventilated Area
Open garage doors or work outside. Good airflow removes dust and any fumes from cleaners. It also keeps the work area comfortable and reduces the chance of inhaling particles.
Use Proper Tools
Use soft brushes and plastic tools when prying plastic clips. Sharp metal tools can nick wiring, crack housings, or damage blade edges. Gentle tools protect the fan and wiring harness.
Avoid Moisture Near Electrical Parts
Keep liquids away from the fan motor and connectors. Use a dry cloth or only lightly dampen a cloth with isopropyl alcohol when needed. Moisture can short circuits and damage the battery management electronics.
Locating The Hybrid Battery Cooling Fan
Before cleaning, you must find the fan. Carmakers vary. In most hybrids the fan sits near or on the battery pack. On many Toyotas and similar models, the pack is under the rear seats or in the trunk.
Check The Owner’s Manual
Your manual shows the battery layout and service points. It is the safest guide for access steps, connector locations, and any special instructions for your model. If in doubt, follow the manual.
Look Under The Rear Seats
Many hybrids store the battery under the rear seat cushion. Lift or remove the cushion per the manual. You’ll usually find a plastic cover or vent area. The fan and ductwork sit nearby.
Inspect The Trunk Area
Some models put the pack in the trunk area. Remove the trunk floor panel or side panels. The fan may be mounted to a cooling duct or inside the battery housing. Look for wiring harnesses and connectors.
Identify The Fan By Its Appearance
The cooling fan looks like a small electric blower. It has blades inside a plastic or metal shroud and a motor with a connector. The fan connects to ducts that move air across the battery cells. Recognizing these parts helps you work faster and safer.
Read More: How Long Does a Toyota Sienna Battery Last
Preparing Your Workspace
Set up before you start. A good workspace saves time and prevents mistakes. I always take five minutes to prepare. It makes the job faster and keeps parts organized.
Clear The Area
Remove loose items and clutter. Clear a flat area for tools and removed parts. A tidy space helps you track screws and small clips. It also reduces the chance of dropping anything into the battery bay.
Gather Necessary Tools
Collect everything listed earlier. Check that screwdrivers fit the screws. Bring compressed air and a brush. Having tools at hand avoids leaving the work area and risking mismatched reassembly.
Ensure Good Lighting
Good light makes cleaning easier. Use a bright LED lamp or headlamp to light inside ducts and under covers. Clear visibility helps you spot trapped leaves, nests, or hair—common culprits for blocked airflow.
Wear Protective Gear
Put on gloves, glasses, and a mask if needed. I always wear gloves to avoid cuts from sharp plastic edges. Safety gear keeps you focused and reduces cleanup afterward.
Prepare The Vehicle
Turn the car off and remove the key. Let the systems cool. If the vehicle was recently driven, give it time—electronics and battery surfaces can be warm. Park on level ground and set the parking brake for safety.
Removing The Cooling Fan Cover
Removing the fan cover is straightforward but requires care. Work slowly. Keep screws and clips organized. I use labeled containers so every fastener goes back in the right place.
Locate The Cooling Fan Cover
Find the cover near the battery pack. It may be a plastic housing or a duct cover. Look for visible screws or snap clips. Refer to the manual for exact access points if you can.
Remove Screws Or Clips
Use the correct screwdriver and ease out screws. If clips hold the cover, pry gently with a plastic trim tool. Forcibly removing clips can crack the plastic. Work around the perimeter, easing the cover free little by little.
Lift The Cooling Fan Cover Off
Once fasteners are removed, lift the cover slowly. Watch for wiring harnesses or connectors attached to the cover. If a connector is present, depress its tab and disconnect gently. Place the cover on a clean towel to avoid scratching it.
Cleaning The Cooling Fan
Cleaning the fan restores airflow and reduces the chance of overheating. Take gentle, deliberate steps. I prefer to clean the fan at least once a year, and more often in dusty or pet-friendly environments.
Dust Removal Techniques
Start by removing loose dust with a soft brush. Work the brush across blade edges and the shroud. Brush debris toward an opening so you can vacuum it out. Do not jab the brush hard into the motor area. Gentle strokes remove most buildup without disturbing bearings.
Using Compressed Air
Use compressed air in short bursts. Hold the nozzle a few inches away. This blows dust from vents and tight corners. Keep the can upright. If moisture appears, stop and switch to a dry cloth. Compressed air clears dust that a brush can’t reach.
Wiping With A Soft Cloth
Finish with a microfiber cloth to wipe blades and shrouds. Lightly dampen the cloth with isopropyl alcohol if sticky residue is present. Avoid pouring liquids. A nearly dry wipe removes remaining dust and leaves surfaces clean for inspection.
Removing hair, leaves and nests
Pet hair and leaves are common in fan intakes. Use tweezers or a small vacuum to extract nests or compacted debris. If you find rodent nesting material, inspect wiring closely for chew marks and consider a professional check.
Inspecting The Fan For Damage
Cleaning is also a chance to inspect the fan for wear. I always look for cracks, loose mounts, and odd noises. Catching small problems early saves time and money.
Look at blades first. Even small nicks change airflow. Then check the housing and mounting points. Finally, listen while the fan runs. Any rough or grinding sound needs attention.
Check Fan Blades For Cracks And Chips
Inspect each blade under good light. Minor scuffs are usually okay, but cracks or missing chunks reduce airflow balance. Replace the fan if blades are damaged to prevent vibration and motor strain.
Examine Fan Housing For Cracks Or Breaks
Check the shroud for cracks or warped sections. A damaged housing leaks air and lowers cooling efficiency. Repair or replace a broken housing to restore ducting and protect the motor.
Listen For Unusual Noises During Operation
After reassembly but before final closure, power the fan briefly. Listen for grinding, rattling, or rubbing sounds. Any abnormal noise suggests worn bearings or foreign objects. Stop and inspect if you hear anything unusual.
Reassembling The Fan Components
Put everything back carefully. I recheck fastener locations against my magnetic tray labels. Correct reassembly prevents rattles, air leaks, and electrical faults.
Aligning The Fan Blades And Motor
Ensure the blades sit straight on the shaft. Spin them by hand to check for clearance. They should turn freely without hitting the shroud. Proper alignment avoids wobble and noise when the fan runs.
Securing The Fan Housing
Fit the housing and fasten screws or clips in the original order. Tighten snugly, but don’t over-tighten plastic clips. Over-tightening can crack the housing and create new problems.
Reconnecting The Electrical Connector
Reconnect the fan harness. Make sure connectors click fully into place. Loose connectors cause intermittent fan operation and fault codes. Secure loose wires with zip ties if needed to prevent rubbing.
Testing The Fan Before Final Assembly
Power the system briefly and check the fan. Verify it runs smoothly. If it does, finish reassembling panels. If it does not, inspect connections, mounting, and blades again before closing everything up.
Testing The Fan After Cleaning
Testing confirms your work. I run a short set of checks to be sure airflow and sounds are normal. These quick tests catch issues before you drive the car.
Visual Inspection During Operation
Start the hybrid system and watch the fan. Blades should spin evenly. No wobble or sideways movement should appear. If you see vibration, power down and inspect alignment and mounting again.
Listen For Unusual Noises
Listen close to the fan. A healthy fan runs quietly. Grinding or squealing points to worn bearings or debris. Address odd noises promptly to avoid bearing failure and more costly repairs.
Check Airflow Strength
Put your hand near the vent or use a simple anemometer. You should feel steady airflow. Weak airflow can mean a blocked duct, damaged blades, or a weak motor. Recheck cleaning and inspect ducts for obstructions.
Monitor Battery Temperature
If you have a diagnostic tool or OBD‑II reader that shows battery temperature, check readings before and after cleaning. Temperatures should be lower or more stable under similar loads. High readings post‑cleaning suggest a deeper problem.
Maintenance Tips For Longevity
Regular care prevents problems. I follow a simple routine that keeps the fan and battery healthy. These habits cut the chance of unexpected failures.
Keep The Fan Area Clean
Brush or blow dust away every 6–12 months. Clean more often if you park under trees or have pets. A clean intake lets the fan pull cool air easily.
Check For Obstructions
Look for leaves, sticks, or foam that block airflow. Remove any object quickly. Clear ducts and vents to restore proper cooling.
Inspect Fan Blades For Damage
Periodically inspect blades and the motor for wear. Replace the fan if blades are cracked or the motor is noisy. Early replacement avoids secondary damage to the battery pack.
Test Fan Operation Regularly
Turn the car on and listen to the fan at least every few months. Any change in sound or airflow means it’s time for a deeper look. Regular checks stop issues before they grow.
Schedule Professional Checks
Include the cooling fan in your regular dealer or shop service. A technician can diagnose electrical faults, check the fan motor current draw, and inspect the battery cooling ducts and BMS (battery management system).
Bottom Line
A clean hybrid battery cooling fan keeps your car running smoothly. Dust and debris block airflow and raise battery temperature. Regular cleaning avoids overheating and costly repairs. Use the right tools, follow safety steps, and inspect the fan for damage while you clean.
Do a quick check every few months. If you drive in dusty areas or have pets, check more often. Small, regular efforts give big benefits. Keep your hybrid cool, safe, and efficient with this simple maintenance task.
Read More: Prius 12V Battery Deep Cycle Vs Standard AGM
FAQs About Clean the Hybrid Battery Cooling Fan
How Often Should I Clean The Hybrid Battery Cooling Fan?
Clean the hybrid battery cooling fan every 12 to 18 months as a rule of thumb. In dusty climates, under trees, or if you have pets, do it every 6 to 12 months. Regular cleaning prevents dust buildup and keeps cooling efficient. Always check your vehicle’s manual for model‑specific intervals and any special instructions.
What Tools Do I Need To Clean The Cooling Fan?
Essential tools: a soft brush, a can of compressed air, a small vacuum nozzle, and a screwdriver. Optional items: an inspection camera, a spare fan motor, and replacement clips. Avoid harsh chemicals or water near electrical parts to prevent damage.
Can I Clean The Hybrid Battery Fan Myself?
Yes. You can clean it yourself if you follow the safety steps. Disconnect the hybrid battery, use gentle tools, and avoid moisture. If you find wiring damage, loud bearing noise, or evidence of rodents, get a professional to inspect the battery pack and electronics.
Why Is Cleaning The Hybrid Battery Fan Important?
Cleaning prevents overheating and keeps the battery at optimal temperature. Good airflow improves battery efficiency and extends lifespan. Dust and debris restrict airflow and can trigger battery fault codes. Proper maintenance keeps your hybrid reliable and efficient.
When to Seek Professional Help
If you find any of the following, stop and call a technician:
- Cracked fan blades or housing.
- Damaged or chewed wiring near the fan or battery pack.
- Loud grinding or bearing noise after cleaning.
- Persistent high battery temperature shown by diagnostics.
- Fault codes that won’t clear after cleaning.
A qualified shop can test fan motor current, inspect the battery management system (BMS), and safely handle high‑voltage components. I recommend professional service for anything beyond basic cleaning and inspection.

Hello, I’m Norman. I work as a car researcher. I am the voice behind CaroraHub. I have over 15 years of experience. I give simple and useful car advice. I help with car care, cleaning, and small repairs. My goal is to help you keep your car healthy. I want car care to be easy and cheap for you. You can trust my tips to keep your car working well for a long time.