In this article I’ll show you how to diagnose parasitic battery drain using a multimeter. You’ll learn a clear, step-by-step process, see real examples, and avoid the common mistakes I’ve seen many DIYers make. Whether you’re new to car electrical work or already comfortable with basic tools, this guide gives practical checks, real data, and confident troubleshooting steps so you can fix or pinpoint battery drain yourself.
Picture this: you park the car at night. In the morning the engine won’t crank. You didn’t leave any lights on. What happened? That’s often a classic case of parasitic battery drain. If it keeps happening, you face repeated jump starts, shorter battery life, and possible costly repairs. I’ve fixed this on several cars with a simple tool: a multimeter. Many drivers don’t realize how easy it is to find the culprit if you follow a clear method.
What Is Parasitic Battery Drain?
Parasitic battery drain happens when electrical devices keep drawing power with the car turned off. A small amount is normal. Things like the clock, alarm, or ECU sleep circuits need a tiny trickle of power. But when other circuits—dome lights, stuck relays, aftermarket accessories—draw more than they should, the battery can’t hold charge.
In my experience, the usual causes are simple: faulty switches, wiring rubbed through by a seat or door, or poorly installed aftermarket gear. I’ve also found hidden items like GPS trackers or old amplifiers left wired to constant power. Even a phone charger forgotten in the center console can add up.
Normal Vs. Abnormal Drain
Most modern cars draw about 20–50 milliamps (mA) when parked and asleep. Readings above 100 mA usually mean there’s a problem. Here’s a quick guide you can use while testing:
| Drain (mA) | Likely Status | Typical Cause |
|---|---|---|
| 20–50 | Normal | Clock, alarm, ECU sleep current |
| 80–100 | Borderline | Faulty relay, extra accessories |
| 100+ | Abnormal | Glove box light, stuck relay, wiring short |
A sudden jump from 40 mA to 150 mA often points to a recent change—new device, wiring work, or a failing component. When I see that jump, I immediately check recent mods and interior lights first.
Real-life Example
I once helped a 2015 sedan owner with overnight drains. The meter read 220 mA. After checking the interior, we found the glove box light stuck on. Fixing the switch dropped the draw to 35 mA and the battery stopped dying.
Another case: a hatchback kept dying after weekends. Draw was 180 mA. A Bluetooth adapter left powered on the constant 12V feed was the culprit. Removing it fixed the problem.
If you want more detail about how parasitic drain can kill a battery in a short time, see Hidden Parasitic Drain Causing Battery Discharge Within 48 Hours.
Why Diagnosing Parasitic Drain Matters
Ignoring parasitic drain can cost you:
- Battery replacement ($120–$250 on average)
- Being stranded or needing frequent jump starts
- Possible ECU or alternator stress over time
- Lower resale value due to unreliable starts
Shops often charge $100–$200 to diagnose drains. I’ve diagnosed several vehicles in under an hour with a multimeter and a methodical fuse pull test.
Repeated deep discharge shortens battery life. Multiple jump-starts may also stress sensitive electronics. Knowing how to test properly saves time and money—and keeps the car reliable.
You May Like This Guide: Prius Hybrid Battery Vs Electric Vehicle Battery Life
Tools You Need
Gather these before you start:
- Digital multimeter (capable of DC current / mA and 10A)
- Protective gloves and eye protection
- Wrench for battery terminals
- Notebook or phone to record readings
Optional but useful:
- Fuse puller
- Repair manual or a diagram of your car’s fuse boxes
Also keep a flashlight and a small mirror for tight spots. A clamp meter is handy for quick checks without disconnecting terminals—see the Advanced Techniques section later.
Quick Diagnostic Checklist (Pocket-sized)
- Meter set to DC current (mA/A)
- Negative battery cable accessible
- All doors closed and keys removed
- Phone ready to record fuse positions/photo
Safety First
Follow these safety rules:
- Work in a well-ventilated area.
- Keep metal tools away from live battery posts.
- Wear gloves and eye protection.
- Never touch both battery terminals at once.
If the car is on a slope, use wheel chocks. Remove jewelry to avoid accidental shorting. If you’re unsure at any point, stop and ask for help. Small mistakes around a battery can cause sparks or damage electronics.
Before You Start: Quick Safety Checklist
- Park on level ground and engage the parking brake
- Turn off all accessories and remove keys
- Have a fire extinguisher nearby if possible
Step-by-step Guide: Diagnosing Parasitic Battery Drain
Here’s a clear, tested method I use every time. Short steps. Fewer mistakes. Good results.
Step 1: Prepare The Vehicle
- Turn off the engine.
- Remove the key from the ignition.
- Close all doors, trunk, and glove box.
- Wait 30–45 minutes for modules to sleep. Some cars need up to 60 minutes.
Don’t skip the wait. Early readings can be falsely high because modules are still awake. For keyless-entry cars, lock manually if possible so you don’t wake electronics with the fob.
Step 2: Set Up Your Multimeter
- Switch the meter to DC amperage (A or mA) mode.
- Plug the red lead into the correct port (10A or mA). Black lead in COM.
- Make sure the meter can handle up to 10A. Don’t exceed the rating.
If your meter has an internal fuse, check it if the meter shows zero unexpectedly. When measuring, use the high-current port first if you suspect a large draw, then move to the low-mA range for accuracy.
Step 3: Disconnect The Negative Battery Terminal
- Use a wrench to loosen the negative (black) terminal.
- Lift the cable off the post. Keep it away from metal.
- This opens the circuit so the meter can measure current through it.
If the terminal is hard to reach, use an extension wrench. Be gentle—old terminals can break. If you have a terminal clamp bolt, undo it enough to separate cable from post but keep it supported so it won’t fall back.
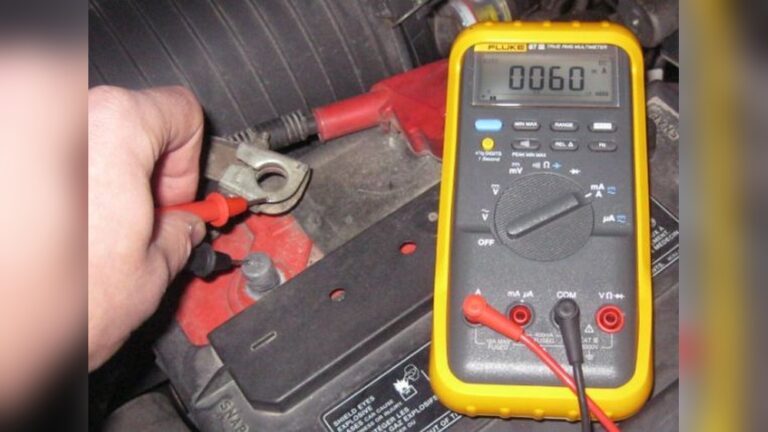
Step 4: Connect The Multimeter In Series
- Place one multimeter lead on the battery post.
- Place the other lead on the cable end you removed.
- The meter now completes the circuit and measures any current flowing.
If you work alone, secure the leads with clamps or tape so they don’t move. A loose connection can cause spikes or no reading at all. Make sure the meter’s probes are on good metal contact points.
Step 5: Read The Current Draw
- Look at the multimeter display.
- Typical: 20–50 mA is normal. Over 100 mA is a problem.
Quick reference:
| Reading (mA) | Action Needed |
|---|---|
| 0–50 | No action |
| 50–100 | Monitor and check accessories |
| 100+ | Locate and fix source |
If the reading flickers, wait a few minutes. Some modules cycle on and off during sleep. If the draw stays high, move to the next step and isolate the circuit.
Step 6: Identify The Problem Circuit
Now we find which circuit pulls the extra current.
How To Do This:
- Locate the fuse box(es)—under the hood and inside the cabin.
- Pull one fuse at a time with a fuse puller or needle-nose pliers.
- Watch the multimeter after removing each fuse.
- If the reading drops a lot (e.g., 220 mA → 40 mA), that fuse’s circuit contains the fault.
If the car has more than one fuse box, test them all. Some high-current accessories are wired through under-hood distribution centers. If no fuse affects the draw, look for devices wired directly to the battery like hidden alarms or tracking units.
Example:
If you pull the “Interior Lights” fuse and the drain drops from 180 mA to 35 mA, something on that circuit—maybe a stuck dome or trunk light—is the problem. That gives you a focused list to inspect next.
Step 7: Trace The Fault Further
With the bad circuit identified, inspect everything on it:
- Lights (trunk, glove box, dome)
- Relays
- Aftermarket devices (dash cams, alarms, subwoofers)
- Wiring—look for frayed or pinched wires
Hidden lights are easy to miss. I often use my phone’s flashlight and camera to look under seats and behind panels. Damaged insulation can touch bodywork and draw current. Electrical tape is a short-term fix; replace or properly repair wiring when possible.
Step 8: Fix The Issue
Common fixes include:
- Replace faulty switches or bulbs
- Remove or rewire aftermarket devices
- Repair or replace damaged wiring
- Replace a stuck relay
After repairs, reconnect the battery and repeat steps 3–5 to confirm the draw is back in the normal range. If you are unsure about removing an installed device, consult its manual or ask the installer. Sometimes pulling a fuse is an easy way to disable a suspect device temporarily while you test.
Practical Tips And Insights
Two Non-obvious Insights
- Many cars “wake up” when doors open or when you touch fuse boxes. Close everything and wait for the system to sleep before testing.
- Aftermarket accessories, especially dash cams or hardwired chargers, often cause drains when installed to constant power. Unplug or disconnect these first.
I keep a photo of fuse layouts and a short log of readings. That avoids confusion and speeds up troubleshooting. If a fuse slot is empty, photograph that too—some previous owners remove fuses and forget to put them back.
Common Mistakes To Avoid
- Not waiting long enough for modules to sleep
- Measuring voltage instead of current by using the wrong meter setting
- Forgetting to note fuse positions before pulling them
- Using the wrong multimeter port (blowing the meter fuse)
A common one I see: people forget to reconnect the battery terminal after testing. Always double-check before starting the car.
Real Data: How Long Can A Battery Last With Drain?
Practical numbers to keep in mind:
| Drain (mA) | Battery Capacity (Ah) | Time to Dead (hours) |
|---|---|---|
| 50 | 48 | 960 |
| 100 | 48 | 480 |
| 200 | 48 | 240 |
A 48Ah battery lasts roughly 10 days with a 200 mA drain. At 50 mA it can last weeks. That’s why what looks like a small extra draw becomes urgent fast—especially in cold weather, where battery capacity drops.
Multimeter Settings: What Beginners Miss
Understanding your meter helps prevent mistakes:
- High current (A, up to 10A): Good for initial checks if you suspect a big draw.
- Low current (mA): Use for precise measurement once you know the draw isn’t massive.
Never exceed the meter’s maximum current. That will blow the meter’s internal fuse or damage the meter. If your meter has ranges, pick the smallest range that covers your expected value for more accurate results.
Diagnosing Drain In Modern Cars
Modern cars use smart modules and wake-up signals. Pulling a fuse can reset a module and hide the problem. To avoid that, use a fuse loop adapter or measure at fuse terminals with the meter set to mA. That leaves the circuit intact while you measure.
Example: Hybrid Car
I helped a hybrid owner who saw 300 mA drain. Pulling the infotainment fuse dropped the draw to 40 mA. The radio stayed awake due to a software bug. A dealer update fixed it. Newer cars can behave like this: some modules keep power on for diagnostics or remote services for a while.
Patience matters. Let modules time out before concluding a circuit is fine.
Battery Drain And Weather
Cold weather reduces battery capacity. Below 32°F, a battery’s available power drops and even small drains can leave you with no start the next morning. If you park outside in winter, check drain more often. Keep terminals clean and protected—corrosion and humidity speed up problems. Use dielectric grease on terminals to slow corrosion.
When To Call A Professional
Get help if you:
- Find multiple circuits or inconsistent results
- See fluctuating or intermittent readings you can’t trace
- Can’t locate fuse boxes or suspect CAN-bus/module problems
Complex wiring errors, CAN bus faults, or hidden modules often need dealer-level diagnostic tools. In those cases, a qualified mechanic can run deeper scans and trace faults with advanced equipment.

Credit: www.youtube.com
Data Table: Battery Drain Symptoms Vs. Repair Cost
Quick guide to symptoms, likely causes, and repair ranges:
| Symptom | Likely Cause | Typical Repair Cost |
|---|---|---|
| Dead battery overnight | Stuck relay, interior light | $50–$150 |
| Low battery after 2–3 days | Alarm, aftermarket device | $80–$200 |
| Battery needs frequent jumpstart | Wiring, module error | $150–$400 |
How To Prevent Parasitic Drain
- Remove unused aftermarket devices or rewire to switched power
- Check trunk, glove box, and dome lights regularly
- Keep battery terminals clean and tight
- Park in a dry, secure place when possible
- Test battery drain every 6 months or after installing electronics
If you add electronics, use switched ignition power or a relay triggered by ignition. Avoid direct battery feeds for accessories unless you understand the wake/sleep behavior.
Advanced Techniques: Clamp Meters
Clamp meters measure current without disconnecting the battery. They are great for quick checks and higher currents. For small parasitic drains (<100 mA) they are less precise. If you use a DC-capable clamp meter, place the wire at the sensor center for best accuracy.
A clamp meter avoids the need to break the circuit, which helps on cars where pulling fuses or disconnecting the battery wakes modules.
Multimeter Brands And Accuracy
Popular, reliable brands:
- Fluke: Highly accurate and durable, pricier.
- Klein Tools: Good value and rugged.
- Craftsman: Affordable and basic for occasional use.
Cheap meters can be inaccurate under 20 mA. If you plan to diagnose drains often, choose an auto-ranging meter with good low-mA resolution and protection fuses.

Credit: www.wikihow.com
Real User Stories
- Sarah, 2018 SUV owner: Battery died every week. Found a 150 mA draw from a dash cam hardwired to constant power. Unplugged it—problem solved.
- Mike, 2007 pickup: Replaced the battery twice. Found a 300 mA draw from a stuck relay. Replaced relay—draw dropped to 40 mA.
Another: Raj, 2012 sedan—battery failed after two days. Using this process he found a USB charger drawing 90 mA even when off. Removing it restored normal battery life.
Linking To Reliable Resources
For background reading, check Wikipedia for an overview of parasitic battery drain causes and concepts. For vehicle-specific behavior, consult the factory service manual or a trusted repair forum for your make and model.
For more solutions like this, check our complete battery troubleshooting guides.
FAQs Of Diagnosing Parasitic Battery Drain Using Multimeter
What Is A Safe Current Draw For A Parked Car?
Most cars should show 20–50 mA when parked. Up to 100 mA can be borderline. Anything above that usually needs attention.
Can A Multimeter Damage My Car Electronics?
No—if used correctly. Always choose the right mode, use the correct ports, and don’t exceed the meter’s max current. Never bridge both battery terminals with a conductive tool or your hands.
How Long Should I_Wait_Before_Testing_Drain?
Wait at least 30–45 minutes after turning off the car. Some vehicles need up to 60 minutes for all modules to enter sleep mode.
What If Removing Fuses Doesn’t Reduce The Drain?
Check for devices wired directly to the battery, like aftermarket alarms or cameras. Also inspect relays and wiring for shorts. If a fuse pull doesn’t change the draw, the problem may be upstream of the fuse or on a fused circuit tied to multiple distribution points.
Is It Normal For Battery Drain To Change In Cold Weather?
Yes. Cold reduces a battery’s effective capacity, making the same drain deplete the battery faster. Check drains more often in winter and keep cables clean.
Final Thoughts
Diagnosing parasitic battery drain with a multimeter is a practical skill that pays for itself. You save money, reduce stress, and avoid being stranded. Follow the steps, record your readings, and be patient while modules sleep. With careful testing you can find the source and fix it—or gather clear evidence to give a mechanic. A well-maintained battery and clean connections mean more reliable starts and fewer surprises.
Learn your car’s fuse layout and keep your tools ready. Even if you don’t do the repair yourself, you’ll be able to explain the issue clearly to a shop and avoid unnecessary charges. Use this guide as your checklist next time your battery dies overnight—and enjoy worry-free driving.

I am Julian Drive, an automotive enthusiast and repair expert with over 7 years of hands-on experience in vehicle maintenance. At Carora Hub, I simplify complex car issues into easy-to-follow DIY guides to help drivers stay safe and save on repair costs.