Where Is The Best Place To Mount A Dash Cam
Dash cams are becoming a must-have for drivers everywhere. They record your trips, capture accidents, and help settle insurance disputes. But many people miss one crucial detail: where to mount the dash cam. The right spot affects video quality, field of view, safety, and even legal compliance. If you’re wondering how to get the best from your dash cam, this guide will help you decide.
Why Dash Cam Placement Matters
Mounting your dash cam isn’t just about sticking it to the windshield and driving off. The mounting location influences what your camera records, how well it works, and whether it’s legal. A poorly placed dash cam can block your view, miss critical footage, or even fall off during rough driving. In some states, mounting in the wrong area can lead to fines.
Many beginners think any spot will do. But the best place to mount a dash cam depends on your car, local laws, and your goals. You should also consider wire routing, sunlight, and privacy. Let’s explore the factors that guide placement, real examples, and how to avoid common mistakes.
What To Consider Before Mounting
Before you reach for the adhesive or suction cup, think about these factors:
1. Field Of View
The dash cam needs to see as much of the road as possible. If you mount it too low or too high, it may miss important details. A wide field of view helps capture accidents, road signs, and license plates.
2. Obstruction
You must keep your windshield clear. The dash cam should not block your vision or distract you while driving. Many states have laws about windshield obstructions.
3. Legal Requirements
Laws vary by location. Some places allow dash cams only in specific spots, like behind the rearview mirror. Others ban devices that block more than a certain percentage of the windshield.
4. Power Source
Consider where you’ll connect the camera. Wiring should be neat, hidden, and not interfere with airbags or controls.
5. Sunlight And Glare
Direct sunlight can cause glare or overheat the dash cam. Placement should minimize exposure to the sun.
6. Privacy
If your dash cam records inside the car (for rideshare or taxis), think about passenger privacy. Some countries require warning signs.
7. Type Of Mount
Suction cups are easy to move but can fall off. Adhesive mounts are sturdy but harder to reposition.
These factors help you choose a spot that works for both safety and performance.
Common Dash Cam Mounting Locations
Let’s look at the most popular places to mount dash cams and their pros and cons.
Behind The Rearview Mirror
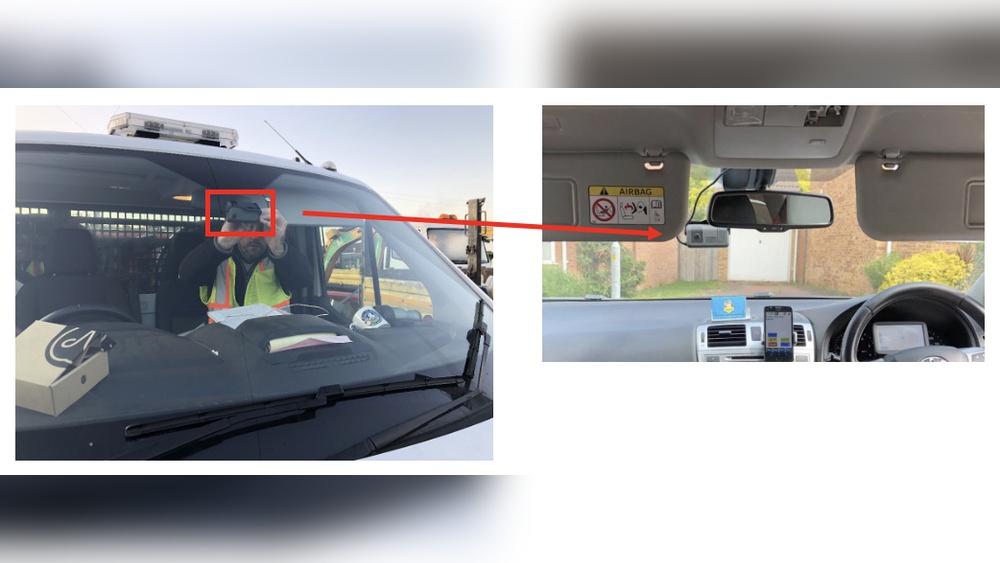
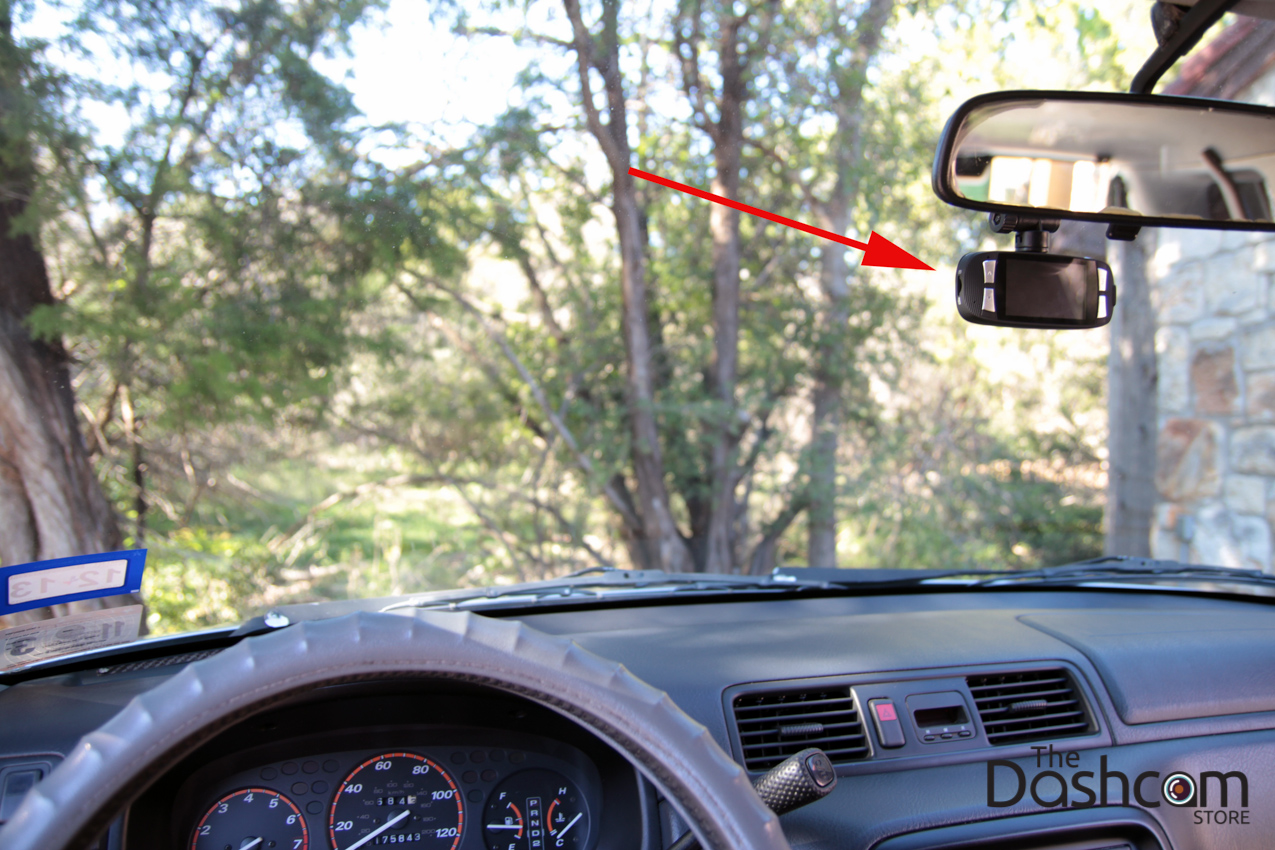
This is the most recommended spot. Mounting behind the rearview mirror keeps the dash cam out of sight, away from your field of vision, and close to the center of the windshield.
Advantages:
- Captures a balanced view of the road
- Does not distract the driver
- Often legal in most states
- Wires can be hidden along the headliner
Disadvantages:
- Some rearview mirrors are large and can block part of the camera’s view
- May require careful adjustment
Top-center Of The Windshield
Mounting at the top-center of the windshield is another good option. It gives a wide view and is easy to reach for maintenance.
Advantages:
- Wide-angle coverage
- Easy to hide wires
- Less likely to be blocked by wipers
Disadvantages:
- Can be affected by sun glare
- May not be allowed in all states
Lower Windshield (driver’s Side Or Passenger’s Side)
Some people mount their dash cam at the lower edge of the windshield. This spot makes it easy to access and check the camera.
Advantages:
- Simple to reach
- Good for small dash cams
Disadvantages:
- Often blocks driver’s view
- More visible to thieves
- May violate local laws
Dashboard Mounting
Mounting on the dashboard is rare. It’s usually done if the windshield is too steep or if the camera is large.
Advantages:
- Easy to install
- No obstruction to windshield
Disadvantages:
- Limited view (may miss the sky or traffic lights)
- Wires are harder to hide
Rear Windshield (for Rear-facing Cameras)
If you use a rear dash cam, mount it at the top-center of the rear windshield. This helps capture accidents from behind.
Advantages:
- Wide rear view
- Good for parking mode
Disadvantages:
- Harder to install and wire
- May not work well with tinted windows
Comparing Popular Dash Cam Mounting Locations
Here’s a quick comparison of the main mounting spots:
| Mounting Location | Field of View | Obstruction Level | Legal Compliance | Ease of Installation |
|---|---|---|---|---|
| Behind Rearview Mirror | Excellent | Low | High | Moderate |
| Top-Center Windshield | Very Good | Low | Moderate | Easy |
| Lower Windshield | Good | High | Low | Easy |
| Dashboard | Fair | None | High | Easy |
| Rear Windshield | Excellent (Rear) | Low | High | Moderate |
The behind rearview mirror location stands out for overall balance.
Legal Regulations For Dash Cam Mounting
Not all dash cam spots are legal. For example, in California, you can place a dash cam only within a seven-inch square in the lower passenger corner or a five-inch square in the upper center of the windshield. Other states, like New York, ban any device that blocks more than 30% of the windshield.
If you want to check your state’s rules, look for the Department of Motor Vehicles website or search for windshield obstruction laws. For example, California DMV lists these rules clearly.
Always make sure your dash cam is mounted in a way that doesn’t violate local laws. If you travel across states, consider a spot that is legal everywhere.
Step-by-step Guide: Mounting Your Dash Cam
Here’s how to mount your dash cam correctly for best performance and safety.
1. Choose The Right Spot
Find a place that:
- Is close to the center of the windshield
- Is hidden behind the rearview mirror or at the top-center
- Does not block your view
2. Clean The Surface
Use alcohol wipes to clean the windshield area. Dust and grease can cause mounts to fail.
3. Attach The Mount
If using an adhesive mount, peel off the backing and press firmly for at least 30 seconds.
If using a suction cup, press and lock the suction mechanism.
4. Position The Dash Cam
Adjust the camera so it faces straight ahead, capturing the road and not too much dashboard or sky. Make sure the lens is centered.
5. Hide The Wires
Route wires along the headliner, down the A-pillar, and into the power source (usually the cigarette lighter or fuse box). Use cable clips or tuck wires under trims.
6. Test The Camera
Turn on the dash cam and review the footage. Check for blind spots, glare, and clarity. Adjust as needed.
7. Secure Everything
Make sure the mount is tight, wires are hidden, and nothing interferes with airbags.
8. Check Local Laws
Confirm your installation is legal. Move the camera if it blocks too much windshield area.
Example: Typical Installation For A Sedan
- Place the dash cam right behind the rearview mirror
- Use adhesive for a firm hold
- Route the wire along the headliner, down the passenger side A-pillar
- Plug into the cigarette lighter
- Hide the wire under the glove box
Mistakes To Avoid When Mounting A Dash Cam
Some mistakes are easy to make, but they can cause trouble later.
1. Mounting Too Low
This blocks your view and can get you fined.
2. Wires Hanging Loose
Loose wires can interfere with airbags and look messy.
3. Mounting In Direct Sunlight
Sun can cause glare and overheat your dash cam.
4. Ignoring Legal Rules
Each state has different laws. Don’t assume your setup is legal everywhere.
5. Not Testing Before Final Mounting
Always check video quality and field of view before sticking the mount permanently.
6. Using Weak Adhesive Or Suction Cups
Cheap mounts fall off. Invest in good quality.
7. Failing To Adjust The Lens
Sometimes the lens points too high or too low. Always check footage.
Dash Cam Types And Their Mounting Needs
Not all dash cams are the same. Some require special mounts or positions.
Single-facing Dash Cams
These record only what happens in front.
Mount at the top-center of the windshield or behind the rearview mirror.
Dual-facing Dash Cams
These record both the front and inside the car.
Mount behind the rearview mirror, and ensure the inside lens faces the cabin.
Rear Dash Cams
Designed for the back of the car.
Mount at the top-center of the rear windshield.
360-degree Dash Cams
These record all directions.
Mount in the center of the windshield or on the dashboard for the widest field.
Weather Impact On Mounting
Weather can affect how well your dash cam stays in place.
- Extreme Heat:
Heat can weaken adhesive or suction mounts. Use mounts rated for high temperatures.
- Cold Weather:
Cold can make adhesive less sticky. Warm the windshield before mounting.
- Humidity:
Moisture can cause mounts to slip. Clean and dry the glass before installation.
- Rain and Snow:
Place the dash cam where wipers keep the glass clean.
Comparing Mount Types: Adhesive Vs. Suction Cup
Let’s compare the two common mount types:
| Mount Type | Strength | Ease of Removal | Reusable | Price |
|---|---|---|---|---|
| Adhesive | High | Low | No | Low |
| Suction Cup | Moderate | High | Yes | Moderate |
Adhesive mounts are best for permanent installation. Suction cups are good if you need to move the camera between vehicles.
How To Hide Dash Cam Wires
One detail many beginners miss is wire management. Visible wires can distract, look bad, and even cause safety issues.
Here’s how to hide your dash cam wires:
1. Route Along The Headliner
Tuck the wire above the windshield trim.
2. Down The A-pillar
Carefully slide the wire under the A-pillar trim. Avoid interfering with airbags.
3. Under The Glove Box Or Dash
Tuck wires under the dash, using clips if needed.
4. Into The Power Source
Plug into the cigarette lighter or use a hardwire kit to fuse box.
5. Cable Clips
Use small clips to hold wires in place.
This keeps your installation neat and safe.
Credit: www.thedashcamstore.com
Privacy Concerns With Dash Cams
Dash cams can record passengers, so privacy is important. If you drive for Uber, Lyft, or other rideshare, some states require you to inform passengers about recording.
- Signs:
Put a clear sign saying “Audio and video recording in progress. ”
- Mute Option:
Some cameras let you turn off audio recording.
- Data Storage:
Keep footage private. Don’t share unless needed for insurance or police.
- Legal Rules:
Check local laws about recording people inside your car.
Dash Cam Placement For Different Vehicles
Placement isn’t the same for all cars. Here are tips for common vehicle types.
Sedans And Hatchbacks
- Mount behind the rearview mirror
- Easy wire routing
- Good field of view
Suvs And Vans
- Higher windshields mean more options
- Mount high for the widest view
- Wire routing can be longer
Trucks
- Mount high, near the center
- Watch for sun visors and large mirrors
Motorcycles
- Use helmet or handlebar mounts
- Waterproof cameras are a must
Rideshare And Commercial Vehicles
- Use dual-facing dash cams
- Mount behind mirror for privacy
- Install signs for passengers
Real-life Examples And Data
A study by the Insurance Institute for Highway Safety found that dash cams reduced insurance fraud cases by up to 50%. But in 30% of cases, video was unclear due to poor placement.
Another survey showed:
- 67% of drivers mounted their dash cam behind the rearview mirror
- 18% used the lower windshield
- 15% tried dashboard or other spots
Mounting behind the rearview mirror gave the best video in 82% of tested vehicles.
Non-obvious Insights For Beginners
1. Check For Tint And Stickers:
Many windshields have tint strips or stickers at the top. Mounting your dash cam here can cause blurry or dark footage. Always place the camera where there’s clear glass.
2. Avoid Airbag Zones:
Don’t route wires through areas where side airbags deploy. If the wire interferes, airbags may not work properly.
Dash Cam Mounting For Parking Mode
If your dash cam records while parked, placement is even more important.
- Mount high for a wide view
- Ensure the lens faces where accidents are most likely (front or rear)
- Use hardwire kits to keep power on without draining the battery
Choosing The Best Spot For Your Needs
Your ideal mounting spot depends on:
- Vehicle type
- Camera type
- Local laws
- Personal preference
But for most drivers, behind the rearview mirror is the best choice. It balances field of view, safety, legality, and neatness.

Credit: www.ddpai.com
Dash Cam Placement And Insurance
Insurance companies often ask for dash cam footage. If your camera is poorly placed, footage may not be usable. For example, if the lens points too low, you may miss license plates.
Some insurers offer discounts for dash cam users. But they require clear, unobstructed footage. Always check your camera placement before relying on it for claims.
How To Remove And Reposition A Dash Cam
Sometimes you need to move your dash cam.
- For adhesive mounts:
Use dental floss or a plastic card to gently pry off the mount. Clean residue with alcohol.
- For suction cups:
Release the suction and reposition.
- Don’t rush:
Take time to test the new spot before final mounting.

Credit: wlius.com
Dash Cam Placement For Night Recording
At night, glare from headlights can spoil footage. Mount the camera high to reduce glare. Avoid areas with direct reflections from dashboard lights or screens.
Comparing Dash Cam Brands And Their Mounting Options
Some brands offer unique mounting solutions. Here’s a comparison:
| Brand | Mount Type | Ease of Installation | Special Features |
|---|---|---|---|
| Garmin | Adhesive | Moderate | Small size, easy wire routing |
| Viofo | Adhesive | Easy | Wide angle lens, parking mode |
| Nextbase | Suction Cup | Easy | Quick release, modular |
| BlackVue | Adhesive | Moderate | Cloud connectivity |
Choose a brand whose mounting system suits your car and preferences.
Frequently Asked Questions
What Is The Best Place To Mount A Dash Cam?
The best place to mount a dash cam is behind the rearview mirror at the top-center of the windshield. This spot offers the widest field of view, keeps the camera out of your line of sight, and is legal in most states.
Is It Legal To Mount A Dash Cam On My Windshield?
It depends on your state or country. Some places allow dash cams only within specific areas of the windshield (like behind the rearview mirror or in the passenger corner). Always check local laws to avoid fines.
How Do I Hide Dash Cam Wires?
You can hide wires by tucking them along the headliner, down the A-pillar, and under the dash. Use cable clips and avoid routing wires through airbag zones. This keeps your setup neat and safe.
Should I Use An Adhesive Or Suction Cup Mount?
Adhesive mounts are strong and permanent, but hard to remove. Suction cups are easy to move but may fall off in extreme weather. Choose based on whether you plan to move the dash cam often.
Can I Use My Dash Cam For Parking Mode?
Yes, but you need to mount the camera high for a wide view and use a hardwire kit for constant power. Make sure the lens faces areas where incidents are most likely.
A well-placed dash cam can protect you, save money, and make driving safer. Take time to choose the right spot, follow legal rules, and ensure your camera records clear footage. Your dash cam is only as good as where you put it.
With careful mounting, you’ll capture everything that matters, whether on the road or parked.

I am Julian Drive, an automotive enthusiast and repair expert with over 7 years of hands-on experience in vehicle maintenance. At Carora Hub, I simplify complex car issues into easy-to-follow DIY guides to help drivers stay safe and save on repair costs.