
If you want fresh, clean air inside your Toyota Sienna, replacing the cabin air filter is key. Over time, this small but important part gets clogged with dust, pollen, and other debris, making your car’s air quality worse.
But don’t worry—changing it yourself is easier than you think. In this guide, I walk you through clear, step-by-step instructions that save time and money. I’ll share tips I use when I replace filters on my own cars, so you can breathe easier every time you get behind the wheel.
Tools And Materials Needed
Replacing the cabin air filter in your Toyota Sienna needs a few basic tools and the right filter. Having these items ready makes the job quick and clean. Most are cheap and easy to find.
I always gather everything before I start. That keeps the job smooth and prevents accidental dust or debris from falling into the HVAC system. Below is what you need and a few choices to consider.
New Cabin Air Filter
Pick a filter made for your Toyota Sienna model year. Check the size and part number so it fits the housing exactly. Look for tags or arrows showing airflow direction on the filter. I mark the installation date and mileage on the filter with a permanent marker so I know when to change it next.
OEM vs Aftermarket Filters
OEM (Toyota) filters match factory specs. Aftermarket filters can be cheaper and may offer higher filtration ratings (MERV or pollen/HEPA-style). I prefer OEM or a reputable aftermarket brand with clear fitment info. Avoid generic, unbranded filters—fit and seal matter for good airflow and dust control.
Filter Cost & Where to Buy
Expect to pay roughly $10–$35 depending on brand and filtration level. You can buy filters from the dealer, big-box stores, auto parts shops, or online marketplaces. Check the filter part number in your owner’s manual or online fitment guides before buying.
Screwdriver Set
A Phillips or flathead screwdriver helps remove screws on the glove box or filter cover. Some Siennas use small screws or plastic clips. I keep both types handy plus a small socket set (usually 7–8 mm). A plastic trim tool also helps release clips without damage.
Flashlight
A small flashlight or headlamp makes it easy to see inside the recess behind the glove box. Good light helps you spot clips, the filter orientation arrow, and any debris to clean out.
Gloves
Wear disposable or work gloves to keep dust off your hands. Filters can be dirty. Gloves also protect your skin if you use a mild cleaner on the housing later.
Soft Cloth Or Vacuum
Use a soft cloth or a small vacuum nozzle to clean dust and leaves from the filter area. Cleaning the housing before installing the new filter improves airflow and reduces odors.
Credit: www.walmart.com
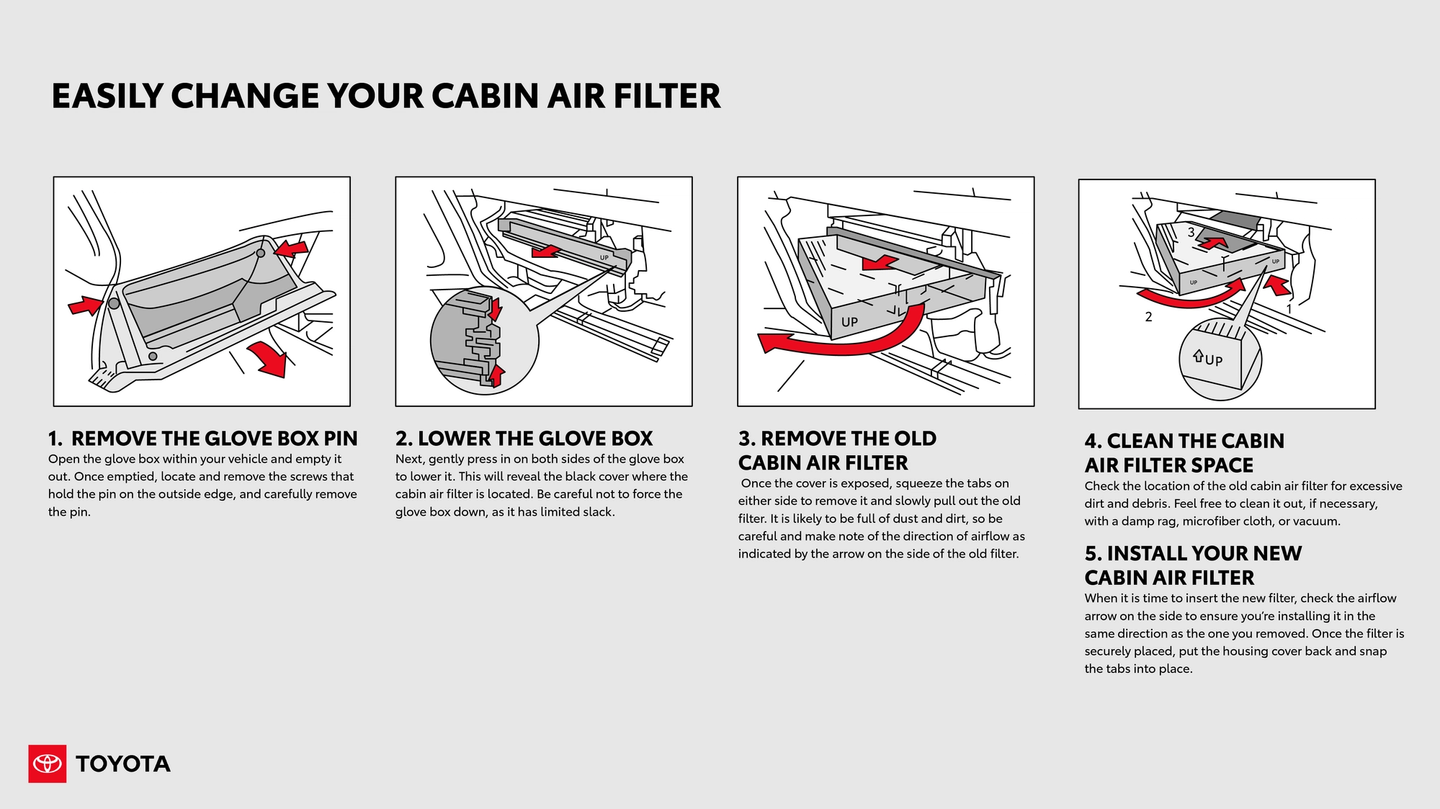
Locate The Cabin Air Filter
Finding the cabin air filter in your Toyota Sienna is the first step to cleaner cabin air. The filter keeps dust, pollen, and road debris out of the HVAC system. In most Sienna models the filter lives behind the glove box. Below I explain how I find the filter and get access without damaging the glove box.
Find The Filter Compartment
Open the glove box fully. Look for plastic tabs or stops on each side that limit how far the box drops. Push in or squeeze those stops gently. The glove box will swing down and give you room to reach the filter housing. In some model years you’ll see a small rectangular access panel with clips or screws—remove these to expose the filter. If you’re unsure, check your owner’s manual for the exact location and any model-year differences.
Accessing The Filter Housing
With the glove box lowered, you will see the filter housing. Look for any fasteners—clips or tiny screws—that hold the cover. Release them slowly. If the cover feels stuck, use a plastic pry tool to avoid cracking it. Once open, note how the filter sits in the slot and which way the airflow arrow points. This makes reassembly quick and correct. If you see leaves or large debris, vacuum them out first so they don’t fall into the blower area.
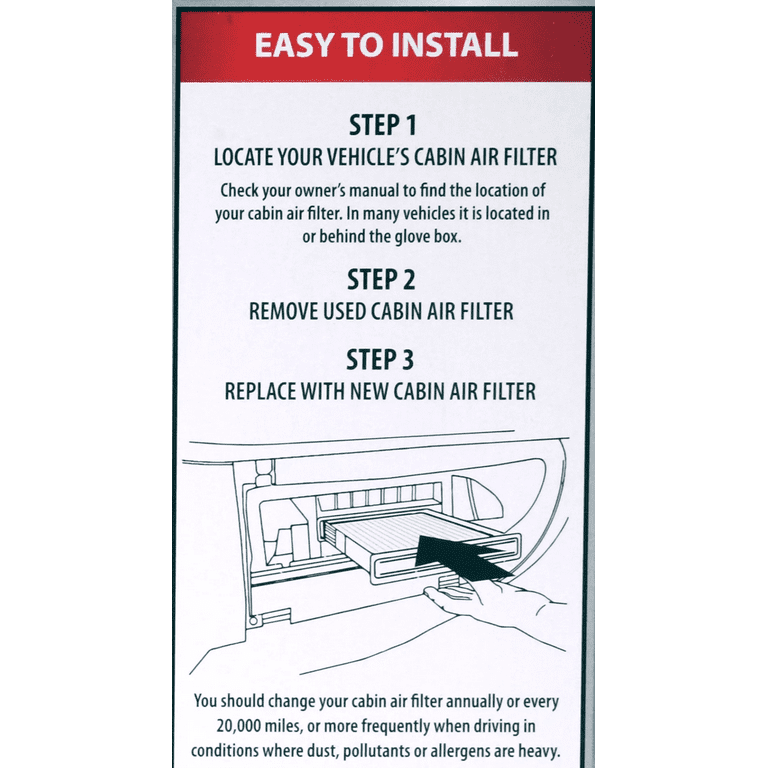
Remove The Old Cabin Air Filter
Removing the old cabin air filter is the core of the job. A dirty filter chokes airflow and lets dust into the cabin. I always take note of how the old filter sits and how dirty it is—this helps me judge replacement frequency for future changes.
Follow these steps for a clean, safe removal.
Open The Filter Cover
Locate the filter cover behind the glove box and lower the glove box to get room. In many Siennas the cover has clips or small screws. Carefully undo them and keep the fasteners in a safe spot. Lay the cover aside where it won’t get stepped on or lost. If the clips are brittle from age, handle gently to avoid breaks.
Take Out The Used Filter
Grab the old filter and pull it straight out. Note the dirty side and the airflow arrow. Avoid shaking the filter inside the car to keep dust contained. I place the old filter in a plastic bag and seal it before disposal. If the old filter is very damp or has mold, wear a mask and discard it at a proper waste facility.
Credit: exploresetoyota.com
Prepare The New Cabin Air Filter
Getting the new cabin air filter ready is quick but important. A correct fit and clean housing give the filter the best chance to work well. I always check orientation and clean the space before installing the new filter.
Check Filter Orientation
Most filters have arrows that show airflow direction. Make sure these arrows point the same way the old filter did or follow the arrow printed near the housing. Installing the filter backward reduces filtration and may increase dust in the cabin. If the new filter has a plastic adapter or foam seal, confirm it’s facing the right way before inserting.
Clean The Filter Area
Use a soft cloth or a vacuum to remove dust, leaves, or small debris from the filter slot and surrounding area. If you find sticky residue, a damp cloth with a mild cleaner will help. Make sure the area is dry before you insert the new filter. A clean housing helps the filter seal well and prevents odors.
Tip: Mark Your Service
I write the date and mileage on the edge of the new filter. It takes seconds and helps you track when to change it next. Many people set a reminder every 12 months or every 15,000–30,000 miles depending on conditions.
Install The New Filter
Installing the new cabin air filter is simple if you follow the orientation and fit rules. A snug fit keeps air from bypassing the filter and keeps your cabin cleaner. Here’s how I do it, step by step.
Insert The Filter Properly
Remove the new filter from its packaging. Align the airflow arrow as noted earlier. Slide the filter into the slot gently until it seats fully. Don’t force the filter. If it resists, check for obstructions or misalignment. A properly seated filter will sit flush in the housing with no gaps.
Secure The Filter Cover
Put the cover back on the filter housing. Reinstall any clips or screws you removed. Press the cover until it clicks or the screws feel secure. Then lift the glove box back into place and re-seat the side stops. Open and close the glove box a few times to confirm it works smoothly.
If the Cover Won’t Close
If the cover or glove box feels tight, double-check that the filter is seated straight and that no debris is trapped under the lip. A misaligned filter is the most common cause of a cover that does not close easily.
Test The Airflow
After you install the filter, test the HVAC system to confirm proper airflow and fit. This step helps you catch any issues before you drive away.
Testing also confirms that the new filter improves air quality and that the fan and vents work as expected.
Turn On The Air System
Start the car and turn on the AC or heater. Set the fan to high and choose fresh-air intake if your Sienna has that setting. This moves air through the new filter quickly and shows if there are any blockages or odd sounds.
Check For Proper Operation
Place your hand near the dash vents. The airflow should feel strong and even. Listen for unusual noises from the blower motor—rattles or whines could mean something is loose. Smells should be fresh. If airflow is weak, re-check the filter orientation and housing seal. If odors persist, consider using an HVAC-safe cleaner or have the system inspected for mold in the evaporator housing.
Maintenance Tips
Taking care of your Toyota Sienna’s cabin air filter keeps the cabin comfortable and your HVAC system working well. Small habits make a big difference. Below are practical tips I use to get the best life and performance from a filter.
These tips help you avoid common issues and keep cabin air free of dust and allergens.
Recommended Replacement Interval
Toyota suggests changing the cabin air filter every 15,000 to 30,000 miles. I aim for every 15,000 miles if I drive in dusty areas or during heavy pollen season. If you mostly drive on clean roads in mild climates, you can push toward the higher end. Check the filter twice a year—spring and fall are good times.
Signs Of A Dirty Cabin Filter
Watch for these signs that the filter needs replacement:
- Reduced airflow from the vents.
- Musty or stale odors when the AC runs.
- Increased dust on the dash and seats.
- Noisy blower motor or rattling from the vents.
If you see any of these, inspect the filter. Replacing it often restores performance quickly.

Credit: www.youtube.com
Frequently Asked Questions
How Often Should I Replace The Cabin Air Filter?
Toyota recommends replacing the cabin air filter every 15,000 to 30,000 miles. Frequent replacement ensures cleaner air and better HVAC performance. If you drive in dusty or polluted areas, replace it more often to maintain cabin air quality and reduce allergens inside your vehicle. I usually check mine every 12 months and change it sooner if I notice airflow loss or bad smells.
What Tools Do I Need To Replace The Filter?
You only need a screwdriver or a small socket wrench to replace the cabin air filter. Most Toyota Sienna models have a simple cabin air filter cover behind the glove box, which can be accessed easily without complex tools. A flashlight, gloves, and a vacuum or cloth are also useful for cleaning the area.
How Can I Tell If The Cabin Air Filter Is Dirty?
A dirty cabin air filter causes reduced airflow, unpleasant odors, and increased dust inside the car. If your HVAC system struggles to blow air or you notice musty smells, it’s time to inspect and replace the filter for better air quality. Visually, a clogged filter looks dark and packed with dirt compared to a new, light-colored one.
Is It Difficult To Replace The Cabin Air Filter?
No, replacing the cabin air filter in a Toyota Sienna is straightforward. The filter is located behind the glove box, which can be opened and removed with basic steps. Even beginners can complete this task within 10-15 minutes. If you prefer, a quick visit to a local shop will cost little and they can show you the process.
Bottom Line
Replacing the cabin air filter in your Toyota Sienna keeps the air fresh inside. Clean filters help remove dust, pollen, and bad smells. It also helps the air conditioner work better and saves energy. Changing the filter regularly is simple and saves money on repairs.
Follow the steps carefully to avoid mistakes. Your car will feel more comfortable and healthy to breathe in. Keep this task part of your regular car care routine for best results. Easy, quick, and worth the effort.

Hello, I’m Norman. I work as a car researcher. I am the voice behind CaroraHub. I have over 15 years of experience. I give simple and useful car advice. I help with car care, cleaning, and small repairs. My goal is to help you keep your car healthy. I want car care to be easy and cheap for you. You can trust my tips to keep your car working well for a long time.