Looking to add extra storage space to your Toyota Sienna? Installing a roof box is a smart way to carry more gear without crowding your interior.
If you’re unsure where to start or worried about making mistakes, this guide is for you. I’ll walk you through a clear, step-by-step process for a safe, tight fit. I’ve installed several rooftop cargo boxes on different vans and SUVs, so I’ll share tips I learned the hard way. By the end, you’ll know how to pick the right roof cargo box, mount it on your Toyota Sienna roof rails and crossbars, and keep it secure for every trip.
Keep reading to learn how to get a perfect Toyota Sienna roof box installation with minimal fuss.
Credit: www.asgautosports.com
Choosing The Right Roof Box
Choosing the right roof box for your Toyota Sienna changes how you travel. The right rooftop cargo box fits your vehicle, holds your gear, and keeps everything safe. I’ll break down options so you can pick with confidence.
Types Of Roof Boxes
Roof boxes come in several shapes and styles. Long, slim boxes are ideal for skis and snowboards. Wide, tall boxes work best for camping gear, strollers, or multiple suitcases. Hard-shell boxes give strong protection from weather and road debris. Soft rooftop cargo bags weigh less and fold away for storage.
For a Toyota Sienna, I prefer a hard-shell box for family trips. It holds gear better and locks securely. If you only need occasional extra space, a soft bag is lighter and cheaper.
Size And Capacity Considerations
Size matters for storage and safety. Measure your Sienna’s roof between the rails and crossbars before you buy. The box should not overhang the sides or block the rear hatch. Capacity is measured in liters and weight. A smaller 300–400 L box is fine for a weekend. Larger 400–600+ L boxes fit long trips. Balance volume with your typical load so you don’t exceed the roof load limit.
Tip: Check the Sienna owner’s manual for the roof load limit (this includes the crossbars and the box). Most setups for the Sienna handle 100–165 pounds including cargo, but your manual is the final word.
Material And Durability
Material affects weight, durability, and price. Most boxes are ABS plastic or fiberglass. ABS plastic resists dents and UV; it’s low maintenance. Fiberglass can be lighter and stiffer but usually costs more. Look for UV-stable finishes to avoid sun damage. Heavy-duty locks, corrosion-resistant hinges, and reinforced mounting points make a box last longer.
Related terms to watch for when shopping: aerodynamic design, dual-side opening, quick-mount systems, and integrated lock systems. These features help in ease-of-use and security.
Recommended Brands and Models
Brands I often recommend for the Sienna: Thule, Yakima, INNO, and Malone. The Yakima SkyBox and Thule Motion or Force lines balance capacity and aerodynamics well. If you want budget options, look for models with solid reviews on fit and durability.
How to Measure Your Roof for Fit
- Measure between crossbars front to back.
- Measure width between side rails to ensure no overhang.
- Check distance from roof edge to rear hatch to avoid interference.
Preparing Your Toyota Sienna
Preparation saves time and prevents problems. Before mounting a roof box, check the roof rails, clean surfaces, and gather the right tools. I always run through a short checklist to avoid surprises.
This prep includes checking roof rack compatibility, cleaning the roof, and gathering tools. Do these steps to make installation fast and safe.
Checking Roof Rack Compatibility
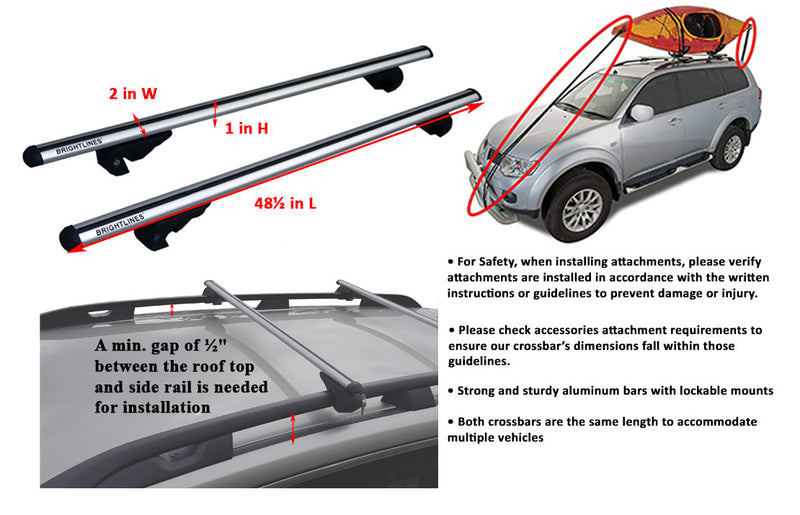
Not every roof rack fits every roof box. Inspect your Toyota Sienna’s factory roof rails and any crossbars. Look at crossbar profile (square, T-track, or aero) and width. Check the roof box manual for clamp or bracket compatibility. Confirm the crossbars and mounting hardware can hold the combined weight of the box plus cargo.
If you have aftermarket crossbars, verify their load rating. If you lack rails or crossbars, you’ll need to install them first. The box won’t sit or attach securely without proper rails.
Cleaning And Inspecting The Roof
Clean the roof and roof rack before installation. I use mild soap and a soft cloth. Remove grit from crossbars and clamp areas so nothing scratches the paint. Check the roof rack for loose bolts, rust, or cracks. Tighten any loose fasteners and replace damaged parts before mounting the box.
Gathering Necessary Tools
Most roof box installs need a wrench, screwdriver, or Allen key. Some boxes include a special tool or quick-fit hardware. I bring a torque wrench to tighten to recommended specs, a tape measure, and rubber pads or weather stripping for extra grip. Lay out tools near the car so you don’t run back and forth.
Read More: Why Toyota Sienna Ac Not Blowing Cold Air
Pre-Installation Checklist
- Confirm roof load limit in the owner’s manual.
- Measure rail spacing and crossbar width.
- Gather tools: wrench, screwdriver, Allen key, tape measure, torque wrench (optional).
- Inspect box hardware and read the manufacturer guide.
- Plan for a helper if the box is large—two people make it easier and safer.
Step-by-step Installation Process
Installing a roof box on your Toyota Sienna is straightforward when you follow steps in order. I’ll keep instructions short and precise. Take your time on each step. If you rush, you may miss a loose clamp or poor alignment.
Positioning The Roof Box
Lift the box onto the crossbars with a helper if possible. Center it side-to-side. Move it forward or back so it’s not too close to the front windshield or the rear hatch. Aim for balance. Positioning matters for handling and fuel economy.
Tip: For long loads—like ski carriers—place the box slightly forward. For heavy camping loads, keep the heavy items centered front-to-back.
Securing The Mounting Hardware
Attach the mounting brackets or clamps to the roof box. Align them over the crossbars. Hand-tighten the hardware first so you can still shift the box. Use supplied washers and bolts. Make sure clamps sit flush on the crossbar profile and do not pinch cables or trim pieces. Verify that any rubber pads sit between clamp and crossbar to protect surfaces.
Tightening And Adjusting For Fit
Now tighten mounting bolts to the manufacturer’s spec. If no spec is given, tighten until snug and recheck after a short drive. Don’t overtighten—over-torquing can damage crossbars or box mounts. After tightening, grab the box and shake it. There should be no significant movement. If it shifts, loosen, reposition, and retighten.

Credit: www.ebay.com
One-Person vs Two-Person Installation
A two-person install is safer for larger boxes. One person can do it alone with a roof box lifter or by sliding the box partially open and using a support. If you go solo, secure the box lightly, then retighten after a test drive. I always recommend a helper whenever possible.
Safety Checks And Maintenance
Routine checks keep your roof box safe and your trips worry-free. Before every drive, check fasteners, locks, and seals. After long trips, inspect the box for wear. Small checks now prevent big problems later.
Testing Stability And Security
Before you drive, check locks and clamps. Push and pull the box to test for movement. If anything feels loose, stop and re-tighten. Make sure the lid closes fully and the lock engages. I also check again after the first 10–20 miles; parts can settle and need a small re-tighten.
Regular Inspection Tips
Inspect the box surface for cracks, worn hinges, or rust on metal parts. Check mounting hardware for corrosion or stripped threads. Replace any damaged parts right away. Inspect seals to keep water and dust out. Small problems are easy to fix. Ignored, they become expensive.
Cleaning And Storage Guidelines
After trips, wash the box with mild soap and water. Avoid harsh solvents and strong brushes that can strip UV protection. Dry fully before storing to prevent mold or mildew. Store the box in a cool, dry place out of direct sun. If possible, store it on a wall rack to save floor space and prevent deformation.
Before Each Trip
- Check bolts, straps, and locks.
- Confirm cargo is secured and balanced.
- Verify you are under the roof load limit.
- Check height clearance for garages and drive-throughs.
Troubleshooting Common Issues
Even with care, you might face fitment, noise, or balance issues. I’ll cover the common problems and quick fixes so you can troubleshoot without delay.
Key focus areas: proper fit, reducing noise and vibration, and good weight distribution. Fixing these things improves safety and comfort.
Dealing With Fitment Problems
If the roof box feels loose or uneven, re-check measurements and clamp position. Tighten bolts evenly. Use rubber pads or foam to fill small gaps and prevent slipping. If the clamps don’t fit your crossbars, a different mounting kit may be needed. Measure twice. Reposition the box along the bars to improve stability if needed.
Handling Noise And Vibration
Noise usually comes from loose parts or poor aerodynamics. Tighten any loose hardware. Add weather stripping or adhesive foam at contact points to stop rattles. Slightly shifting the box fore or aft can change airflow and reduce wind noise. Remove unnecessary gear inside the box to reduce internal movement and vibration.
Adjusting For Weight Distribution
Balance is key. Put heavy items in the center and as low as possible inside the box. Spread weight evenly side-to-side and front-to-back. Check the Sienna’s roof load limit before packing. Distribute heavy cargo between the roof box and the vehicle interior if needed to keep the center of gravity low. Proper distribution improves handling and fuel economy.
When to Call a Professional
If mounting hardware seems incompatible, if you notice structural damage on your rails, or if the box continues to move after fixing clamps, see a pro. A certified installer can check mounting points and recommend reinforced crossbars or a different rack system.

Credit: www.youtube.com
Frequently Asked Questions
How Do I Install A Roof Box On A Toyota Sienna?
First, ensure your Sienna has roof rails. Attach the roof box mounting brackets securely to the rails. Follow the box manufacturer’s instructions for tightening. Check all fittings before loading to ensure safety and stability during travel. I always do a short test drive and re-check bolts afterward.
What Tools Are Needed For Toyota Sienna Roof Box Setup?
You typically need a wrench or screwdriver for tightening brackets. Some boxes include specialized tools. Having a measuring tape helps align the box centrally. Always refer to the roof box manual for specific tool requirements. A torque wrench is helpful if the manufacturer gives torque specs.
Can I Install A Roof Box Without Roof Rails?
No, Toyota Sienna roof boxes require roof rails or crossbars. Without these, the box cannot be securely mounted. Consider installing aftermarket roof rails or crossbars before adding a roof box. Many quality crossbar systems are available for the Sienna and are straightforward to install.
How Much Weight Can A Toyota Sienna Roof Box Hold?
Most roof boxes for the Sienna support between 100 to 165 pounds. Check your vehicle’s roof load limit in the owner’s manual. Do not exceed these limits to avoid damage or unsafe driving conditions. Remember that the load limit includes both the box and the cargo.
Quick Packing Tips
- Distribute heavy items centrally.
- Use soft items to fill gaps and prevent shifting.
- Secure loose gear with straps inside the box.
Conclusion
Installing a roof box on your Toyota Sienna adds useful storage for family trips and gear. Follow each step carefully to ensure a secure fit. Double-check all parts before hitting the road. Regular maintenance and inspections keep the box in good shape and extend its life.
Safe travels start with proper installation and care. This guide helps you carry more with ease. Ready for your next adventure?

Hello, I’m Norman. I work as a car researcher. I am the voice behind CaroraHub. I have over 15 years of experience. I give simple and useful car advice. I help with car care, cleaning, and small repairs. My goal is to help you keep your car healthy. I want car care to be easy and cheap for you. You can trust my tips to keep your car working well for a long time.